The "Gold Medalist" in Ovarian Cancer Research | OVCAR-3 cell culture & gene editing Tips


The "Gold Medalist" in Ovarian Cancer Research | OVCAR-3 cell culture & gene editing tips

OVCAR-3 cells, the "Gold Medalist" in ovarian cancer research, have earned their reputation by closely mimicking the chemoresistant characteristics observed in clinical settings. They have become a “core curriculum” for exploring tumor resistance mechanisms, targeted therapy strategies, immune evasion pathways, and gene function studies. From drug screening to gene knockout, from signaling pathways to cell fate determination, OVCAR-3 cells are virtually omnipotent—a “standard tool” on every cancer researcher’s bench. If you haven’t used them yet, you might already be missing a fast track to the research frontier! Today, we are here to help you unlock the secrets of working with OVCAR-3: sharing some practical cell culture experience and efficient gene editing techniques to help you get twice the results with half the effort—and confidently ace your key experiments!
OVCAR-3 Cell Information
Cell Name: OVCAR-3 (Human ovarian cancer cell line)
Cell Morphology: Epithelial-like, adherent cells
Culture Conditions: d80% RPMI-1640 + 20% FBS + 0.01 mg/mL insulin
Gas Phase: Air 95%; Carbon dioxide 5%
Temperature: 37℃
Medium Change Frequency: Every 2–3 days
Passage Ratio: 1:2 to 1:3
Normal Growth Appearance: Cells exhibit irregular epithelial-like morphology, mostly polygonal or spindle-shaped, often displaying a “cobblestone” pattern
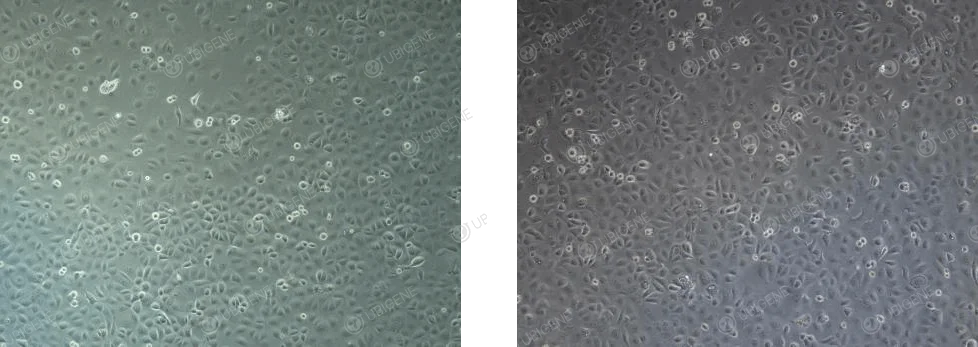
OVCAR-3 Cells Normal Growth Appearance
Poor Cell Growth Appearance: Cells exhibit abnormal morphology, such as enlarged and flattened cell bodies (as shown in the red box in the image below). Cells may become irregular in shape, lose their typical cobblestone-like appearance, and display vacuolization and other signs of distress.
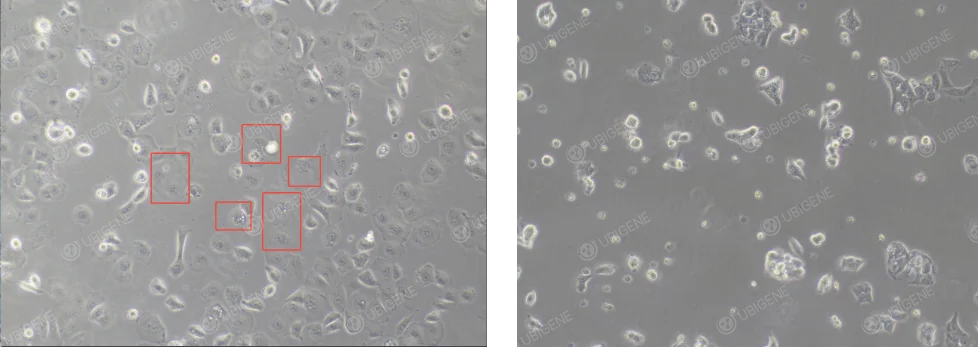
OVCAR-3 Cells Poor Growth Appearance
Cell Thawing
1. Preparation: Place 7 mL of complete culture medium in a centrifuge tube and keep it on standby.
2. Thawing: Remove the cells from dry ice, hold the cap with forceps, and place it in a 37°C water bath, shaking quickly (Note: Water should not cover the cap). Allow the cells to thaw completely within about 1 minute, until the ice melts to the size of mung beans, then stop the water bath.
3. Centrifugation: Transfer the thawed cell suspension to a centrifuge tube and centrifuge at 1100 rpm for 4 minutes, discard the supernatant.
4. Resuspension and Seeding: Resuspend the cells in complete culture medium and seed them into a culture dish/flask of appropriate size.
5. Culturing: Place the culture dish/flask in a 37°C incubator for culturing. Observe the cell condition and adhesion status after 24 hours.
Cell Passaging (Using a T25 Flask as an Example)
1. When the cell confluence reaches 80%, passaging can be performed. In the laminar flow hood, discard the culture medium in the flask and wash the cells 1-2 times with 5 mL of PBS.
2. Add 1 mL of trypsin, gently shake the flask to ensure the trypsin completely covers the cells, and then place the flask in the incubator for 3-4 minutes. When most cells appear rounded and bright under the microscope, and a majority of cells detach from the flask upon gentle shaking, immediately terminate the digestion.
3. Add 2 mL of complete culture medium (twice the volume of trypsin) to terminate the digestion, then transfer the cell suspension to a 15 mL centrifuge tube.
4. Centrifuge at 1100 rpm at room temperature for 4 mins. After centrifugation, discard the supernatant and resuspend the cells in complete culture medium.
5. Passage the cells at a ratio of 1:2 to 1:4. Observe the cell condition the day after passaging.
Cell Cryopreservation
1. Cell Collection: Collect the digested cells into a centrifuge tube following the cell passaging procedure.
2. Centrifuge: Centrifuge at 1100 rpm for 4 mins, then discard the supernatant.
3. Resuspension and Freezing: Resuspend the cells in cryopreservation medium. Aliquot the cell suspension into cryovials at a density of 1×10^6 cells/mL. Label the vials with the cell name, passage number, date, and other relevant information.
4. Cooling and Storage: Place the cryovials in a controlled-rate freezing container and store them overnight in a -80℃ freezer. Afterward, transfer the vials to a liquid nitrogen tank for long-term storage.
Down the OVCAR-3 cells culture guide for free>>>
Cell Culture Precautions
1. When culturing OVCAR-3 cells, the serum concentration must be strictly maintained at 20%, and 0.01 mg/mL insulin should be added.
2. During cell digestion, control the digestion time carefully. Try to dissociate cells into single cells and avoid vigorous pipetting—handle gently.
3. The seeding density should not be too low. It is recommended to passage at a ratio of 1:2 to 1:3 when cells reach approximately 80–90% confluency to maintain healthy cell status.
4. It is recommended to use high-quality fetal bovine serum (FBS) for culturing these cells.
How to Improve Poor Cell Condition?
1. Medium and Serum: Ensure the use of the correct base culture medium and high-quality fetal bovine serum (FBS). The serum concentration significantly affects the adhesion of OVCAR-3 cells—too low serum levels may impair cell proliferation.
2. Cell Culture Environment: Confirm that the incubator temperature, humidity, and gas phase conditions are normal.
3. Avoid using expired or long-stored culture medium. Freshly prepared medium should be used within two weeks.
Cell Passage Procedures: During cell passaging, pay attention to the digestion time and trypsin concentration to avoid cell damage caused by either too long or too short digestion times.
How to Adjust for Cellular Senescence?
1. Confirm Culture Conditions and Environment: Ensure that the culture conditions and environment are correct.
2. Avoid Over-Digestion with Trypsin: Use appropriate trypsin concentration and digestion time, and avoid vigorous pipetting to prevent cell damage.
3. Increase serum concentration/select high-quality fetal bovine serum (FBS): Higher serum concentrations and high-quality FBS can support cell health.
4. Adjust cell density: Overly high cell density can lead to nutrient depletion and accumulation of metabolic waste, accelerating cellular senescence. Maintain cell density within an optimal range.
5. Add growth factors: Growth factors can promote cell proliferation and differentiation, helping to improve the state of cellular senescence.
6. Switch to Lower-Passage Cells: Use cells with lower passage numbers to ensure they are less likely to have undergone senescence.
7. Screening for Clones with Growth Advantage:Select single clones from the senescent cell population through methods like single-cell cloning. These clones, which have a growth advantage, can then be cultured for purification.
Precautions for OVCAR-3 Cell Transfection
1. Ensure the cells are in good condition and in the logarithmic growth phase, when cell activity is high and division is vigorous, which is conducive to improving transfection efficiency. The cell density should generally be between 70-80%.
2. Pay attention to the cell digestion time to avoid over-digestion, which can harm the cell.
3. During the experiment, the cells should be pipetted into single cells to avoid cell aggregation.
4. The viability of the cells should be ≥80% when conducting experiments.
5. When using electroporation, control the amount of cells being electroporated and seed them into an appropriate culture plate afterward;
6. When using electroporation, ensure that the cell adhesion rate after electroporation is ≥70%.
7. When performing transfection with electroporation, it is important to control the experimental time, as the entire electroporation process should not be too long.
8. After electroporation transfection for 24 hours, promptly replace with complete medium containing high-quality fetal bovine serum.
9. When using lentivirus for experiments, control the cell confluence to be between 30-40% before infection; it should not be too high.
10. Before conducting formal experiments with viral methods, a preliminary experiment can be performed to find the most suitable MOI (Multiplicity of Infection); add the transfection enhancer Polybrene before infection.
11. Transfection reagents should be thoroughly mixed before use to ensure their uniformity.
OVCAR-3 Single Clone Plating Experiment Precautions
1. Ensure that the cells are in normal condition with few senescent cells before plating clones. It is recommended to control the cell confluence at around 70%.
2. The viability of the cells should be ≥80% when plating clones.
3. Conduct a preliminary experiment to find the appropriate plating density gradient to avoid too low a proportion of single clones.
4. When seeding cells onto a 96-well plate, ensure that the cell distribution is even.
5. After diluting and counting the cells, the optimal result should fall between 1*10^6-2*10^6.
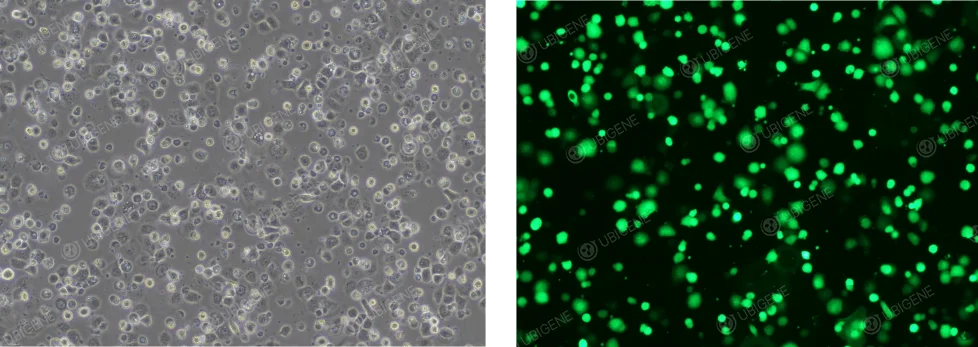
OVCAR-3 cell electroporation
Have more questions? Feel free to contact our technical experts!
 Promotions